Whoops! A slight mistake in my first set of foamcore plans. Please note that the card tray in the Merchant of Venus plans should be 22mm in total height, not 25mm. A thousand apologies! The error has been fixed and the file updated to v1.1.
Whoops! A slight mistake in my first set of foamcore plans. Please note that the card tray in the Merchant of Venus plans should be 22mm in total height, not 25mm. A thousand apologies! The error has been fixed and the file updated to v1.1.
This site uses Akismet to reduce spam. Learn how your comment data is processed.
ALL RULES, GAME GRAPHICS AND GAME IMAGES ON THIS SITE AND IN ANY FILES DOWNLOADED FROM THIS SITE ARE THE PROPERTY OF THEIR COPYRIGHT OWNERS. DOWNLOADABLE PDFS ARE INTENDED ONLY FOR THE PERSONAL USE OF EXISTING OWNERS OF THE GAMES AND MAY NOT BE RE-POSTED ONLINE, SOLD, OR USED IN ANY OTHER WAY. THE OPINIONS EXPRESSED ARE SOLELY THOSE OF THE SITE AUTHOR AND DO NOT NECESSARILY REFLECT THOSE OF THE PUBLISHERS OF THE GAMES MENTIONED.
Thanks for the update. I managed to slice off the top 3mm of the card tray without losing a finger. Not the smoothest edge you’ve ever seen, but function beats form every time, and I’m not about to make it again from scratch just for the sake of aesthetics!
Well done—I sometimes have to do the same if I’ve made an error while building. With a fresh new blade it can be done relatively easily. I’ll be extra careful with my measurements from now on.
Just wondering how easy it is to pull all the trays out. They look pretty snug in the box. How exactly do you get ’em out?
Oh, you don’t get them out. In fact I recommend gluing them in place. It’s a form of permanent storage.
Ho ho! You grab them by the closest convenient hand hold and lift.
Remember however, that you check all measurements and placements as you build. As I’ve been doing this for a while, I can get away with pretty tight tolerances. If you’re new to foamcore building, you may not be so precise and should allow for that. It’s not an exact science.
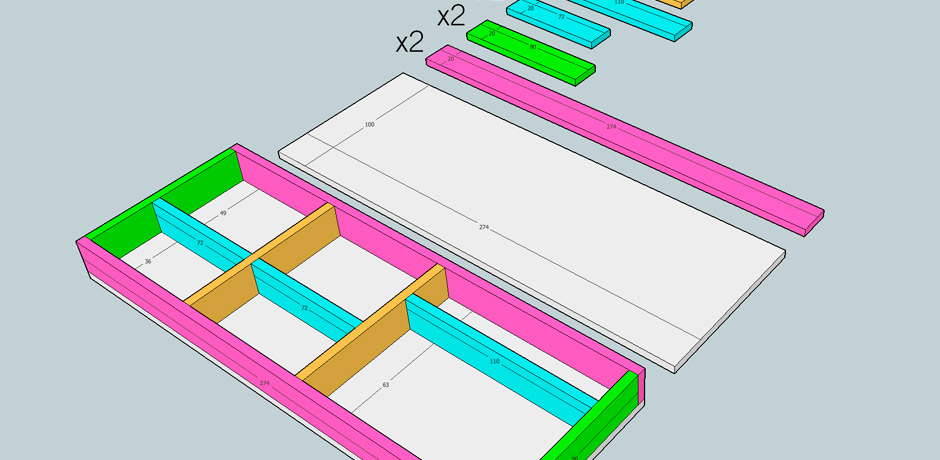
Slight error on main box diagram. It shows 2 magenta 286mm parts but the built version shows one 286 and one 276mm. The 276 should of course be on the cyan strip.
Any idea how high to make the card tray for sleeved cards?
This looks like a great solution, now to try and get some craft skills.
It’s correct—on the built diagram, the 286 refers to the length of the entire side of the insert, while the 276 is referring to the length of the inside of the box (ie, 286 minus the combined 10mm width of the two other sides).
Sorry, but I don’t sleeve cards myself, and I’d probably drive myself stark raving mad making box inserts for both sleeved and unsleeved cards. But if you follow the recommendations in my foamcore videos, you should be able to whip up your own solution. It might be tricky getting everything to fir for this one though, as tolerances are pretty tight! Good luck!
Ah, I see, my error. Doh! Thanks.
No worries, I always appreciate people checking to see if anything the EOG produces is correct.
Does this handle both the classic and standard version of the game, or just one version’s worth of componants?
Most definitely both – in fact it even keeps the components from each version separate to make setup even easier.
Thank you for these plans! My copy of Merchant of Venus was a pile of messy baggies in the box and the thought of sorting and setting it up every time put me off playing. I just finished putting this together and it works great!
You’re welcome Emma, glad to hear it was a successful build.
Superb! My first attempt at an insert, with only a few ‘take apart and start again’ moments 🙂 Very pleased with the finished result. Makes getting it to the table, so much easier. Many thanks.